Hello Crafty Friends,
It's the 1st of April, and time for a new challenge over at AAA Birthday.
The theme for the month is -
Layer It Up!
We want to see birthday cards with layers.
It can be layers of paper or if you make CAS cards an image with layers.
As long as it's a birthday card and you have layers in someway on it we're happy.
Here's my take on the challenge
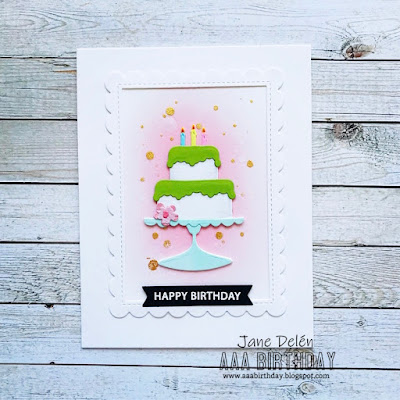
I was inspired by the cake on the challenge card, please see below, and decided to build a layered cake on my card. Besides the cake having two tiers, it also consists of a few layers of paper, so does the cake stand and the flower on it.

Here's how I made the card;

I hope you're inspired to play along with us this month, as we would love to see your take on this fun Birthday card challenge. You have until April 30th to create, upload and link your cards to AAA Birthdays challenge blog. For more information and beautiful inspiration by my talented design team colleagues, and our two special guest designers for the month, Denise and Shruti, please visit the challenge blog, and don't forget to show them some love.
If you'd like to know how I created my card and what products I used please continue reading!
Here's how I made the card;
I die cut all the pieces I needed for the cake and the cake stand, coloured the cake stand using Copic markers and assembled the cake on the cake stand. I thought the cake looked a little bare so I decided to add a flower to it. After die cutting, colouring and assembling the flower I first placed it on top of the cake as on a traditional "Prinsesstårta" (a Swedish classic "Princess cake" filled with jam, custard cream and whipped cream, and covered in green marzipan with a pink marzipan rose on top), but didn't like how it looked so I placed it on the cake stand instead. The cake die set didn't come with any candles, but I felt my cake needed something on top. I grabbed my "Lucia" die set and die cut a "Lucia crown", trimmed it a bit and coloured the candles and glued it to the back of the cake, Voilà I had cake candles.
For the background I die cut a rectangle, ink blended on it and splattered some gold splatters. I addhered the cake to the background and added a die cut scalloped rectangled frame. I glued the piece to a card base and added a die cut, stamped and heat embossed sentiment,
For the background I die cut a rectangle, ink blended on it and splattered some gold splatters. I addhered the cake to the background and added a die cut scalloped rectangled frame. I glued the piece to a card base and added a die cut, stamped and heat embossed sentiment,
Products used
Papers: Neenah Solar White, "Cilantro cardstock" by Lawn Fawn, Watercolour paper
Dies: "Stitched Scalloped Rectangle Frames" and "Everyday Sentiment Banners" by Lawn Fawn, "Tårta D171003" and "Lucia tillbehör D221030" by Gummiapan, "Brushstroke Flowers, Mini" by Tim Holtz/ Sizzix
Stamps: "Reveal Wheel Circle Sentiments" by Lawn Fawn
Ink: Distress Oxide by Tim Holtz/ Ranger
Paint: Distress Watercolor Pencils by Tim Holtz/ Ranger
Markers: Copic
Splatters: "Color Shine in Gold" by Heidi Swapp/ American Crafts
Embossing powder: WOW! Opaque Bright White Super Fine
Thank you so much for taking the time to stop by, I really appreciate it!
Take care, keep crafting and have fun!
Jane
x
Take care, keep crafting and have fun!
Jane
x

Love your layered cake, it look delicious
SvaraRaderaYour layered cake is really effective and jumps right out middle of page xxx
SvaraRaderaYour cake is lovely - I partularly like the flower you've added to the base and those candles from the Lucia crown are the perfect size! Hugs, Kate!
SvaraRadera